
There’s something magical about Pierogi Wigilijne—the way they bring everyone together around the Christmas Eve table, steaming and golden, filled with love (and maybe a little too much butter). I remember my grandmother rolling out the dough with such care, her hands dusted in flour, while the rest of us fought over who got to pinch the edges shut. These Polish Christmas pierogi aren’t just food; they’re tradition, comfort, and celebration all wrapped up in one delicious bite. Whether you stuff them with sauerkraut, mushrooms, or sweet prunes, they’re always the star of Wigilia. And trust me, once you make them yourself, you’ll understand why they’re worth every minute of effort.
Why You’ll Love Pierogi Wigilijne
- They taste like Christmas—warm, comforting, and full of tradition.
- Endless filling options, from savory sauerkraut to sweet poppy seed—you can’t go wrong.
- Perfect for holidays—make them ahead and freeze, so you’re not stuck in the kitchen on Wigilia.
- Fun to make with family—rolling, filling, and pinching is a holiday activity in itself!
- Freezer-friendly—because nobody should have to live without pierogi on a random Tuesday.
- Crowd-pleasers—even picky eaters can’t resist these little pockets of joy.
- Better than store-bought—homemade dough is softer, richer, and worth every second.
Ingredients for Pierogi Wigilijne
(Psst—don’t let the simple ingredient list fool you. These humble ingredients transform into something magical!)
- 500g all-purpose flour (plus extra for dusting—trust me, you’ll need it)
- 250ml warm water (just warm enough that you can comfortably dip a finger in)
- 1 large egg (room temperature—it blends into the dough smoother)
- 1 tsp salt (don’t skip this—it brings out all the flavors)
Filling options (pick your favorite!):
- Mashed potatoes (1.5 cups, seasoned with butter and a pinch of nutmeg—my grandma’s trick)
- Sauerkraut (200g, drained and sautéed with onions for extra flavor)
- Mushrooms (200g, finely chopped and cooked till golden)
- Sweet farmer’s cheese (or ricotta mixed with a touch of sugar)
- Prunes or poppy seeds (for the classic sweet version—so good with a dusting of powdered sugar)
Ingredient Notes & Substitutions
No all-purpose flour? Bread flour works too—just expect a slightly chewier dough. Need it gluten-free? Swap in a 1:1 GF blend (I’ve had great results with King Arthur’s). Out of eggs? A tablespoon of oil or an extra splash of water can help bind the dough in a pinch. For fillings, get creative—leftover roasted squash or caramelized apples make amazing sweet versions. Just remember: drier fillings = fewer leaks!
Equipment Needed for Pierogi Wigilijne
You don’t need fancy gadgets—just a few basics to make pierogi magic happen! Here’s what I always grab:
- Rolling pin (or an empty wine bottle in a pinch—no judgment!)
- Glass or round cutter (about 3 inches wide—I use a water glass)
- Large pot for boiling (wide enough so pierogi don’t crowd)
- Slotted spoon (to rescue those floaty little dumplings)
- Clean kitchen towel (to keep dough from drying out)
Optional but fun: A pierogi press if you’re making loads, or a fork for crimping edges extra-pretty.
How to Make Pierogi Wigilijne
Making pierogi is like a little holiday dance—mix, roll, fill, pinch, boil, and repeat! Don’t stress if your first few look wonky (mine always do). By the time you’re halfway through, you’ll be a pierogi-pinching pro. Here’s how to nail each step:
Step 1: Prepare the Dough
In a big bowl, mix the flour and salt. Make a well in the center and crack in the egg, then pour in the warm water. Stir with a fork until it starts coming together, then get your hands in there! Knead for about 5 minutes until it’s smooth and elastic—like playdough that bounces back when you poke it. If it’s sticky, add a sprinkle more flour. Cover with a towel and let it rest for 20 minutes (this relaxes the gluten so it’s easier to roll).
Step 2: Shape and Fill Pierogi
Roll the dough out thin—about 2mm thick (you should almost see the counter through it). Cut circles with a glass or cutter. Spoon 1 tsp of filling onto each circle—don’t get greedy or they’ll burst! Fold the dough over and pinch the edges tightly. If you spot air bubbles, poke them with a toothpick. Leaky pierogi? Dab the edges with water and re-pinch. Pro tip: Keep unused dough covered so it doesn’t dry out while you work.
Step 3: Cooking Pierogi Wigilijne
Bring a big pot of salted water to a gentle boil. Drop in 5-6 pierogi at a time—don’t crowd them! They’re done when they float (about 3-5 minutes). Scoop them out with a slotted spoon. For extra golden goodness, sauté them in butter (or oil) with onions until crispy. Sweet pierogi? Skip the sauté and dust with powdered sugar instead. Either way, serve hot—they’re best fresh off the stove!
Tips for Perfect Pierogi Wigilijne
Want pierogi that don’t burst, stick, or turn into doughy blobs? Here are my hard-earned secrets:
- Keep that dough covered! A damp towel prevents drying—cracked edges are the enemy.
- Test one pierog first—boil a single dumpling to check sealing and timing before committing the whole batch.
- Freeze like a pro—lay uncooked pierogi on parchment paper before bagging so they don’t fuse into one giant blob.
- Roll thin, but not too thin—2mm is the sweet spot between sturdy and tough.
- Pinch with wet fingers—a dab of water helps seal edges tight against leaks.
And the golden rule? Don’t stress the ugly ones—they all taste amazing fried in butter!
Serving Suggestions for Pierogi Wigilijne
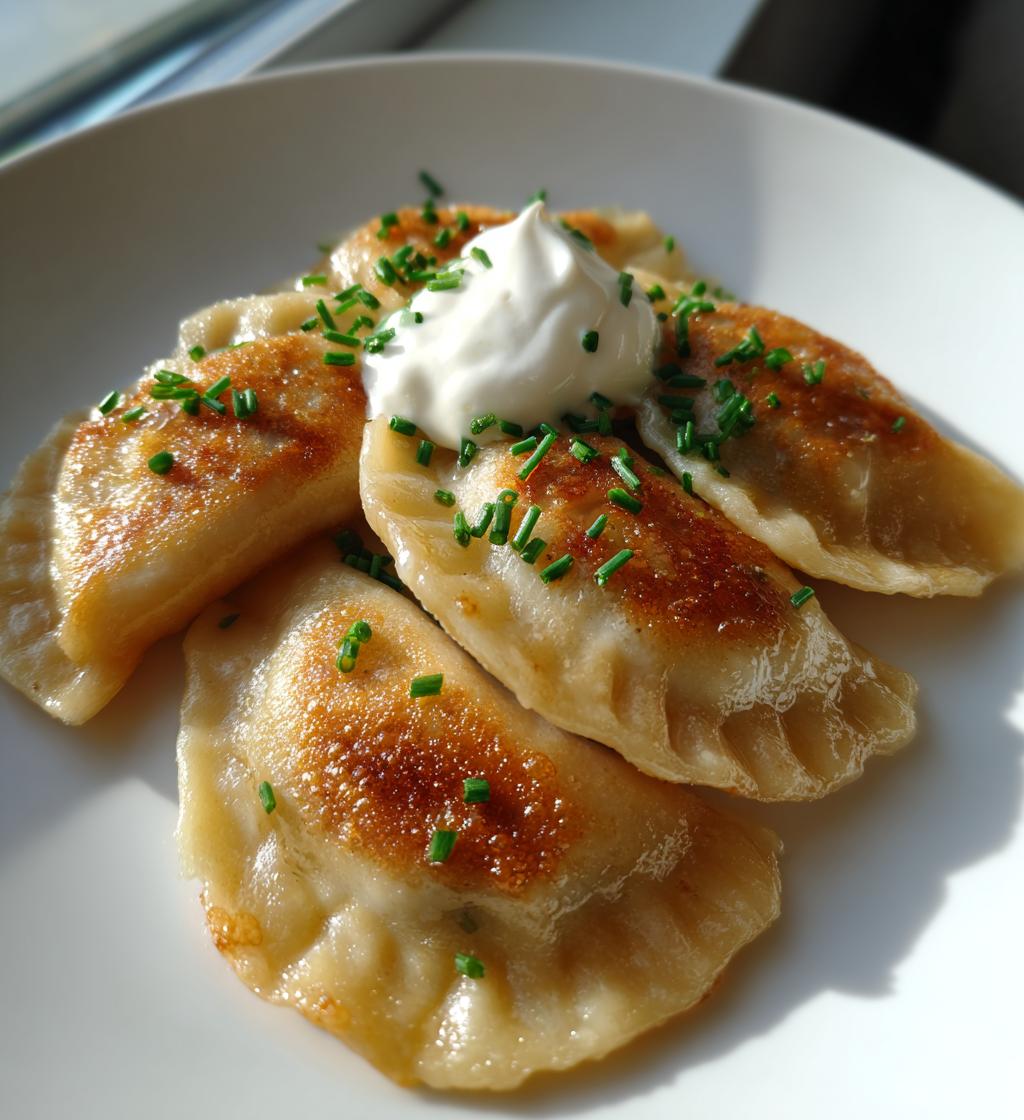
Oh, the joy of dressing up these little dumplings! For savory pierogi, I always go for golden caramelized onions and a dollop of cool sour cream—it’s classic for a reason. Sweet versions? Dust them with powdered sugar or serve with warm applesauce (my aunt swears by a drizzle of honey too). And don’t forget crispy bacon bits for that salty-sweet crunch—trust me, it’s a game-changer!
Storing and Reheating Pierogi Wigilijne
The best part about pierogi? You can stash them away for future cravings! Here’s my foolproof method:
- Freezing uncooked: Lay them in a single layer on a parchment-lined tray, freeze solid (about 1 hour), then transfer to bags—no sticking!
- Fridge storage: Keep boiled pierogi in an airtight container for up to 3 days (separate layers with parchment).
- Reheating: Toss frozen pierogi straight into boiling water (add 1-2 extra minutes) or pan-fry from frozen in butter until crispy.
Pro tip: Frozen pierogi last up to 3 months—because Christmas flavors deserve a year-round encore!
Pierogi Wigilijne Nutritional Information
Okay, let’s be real—pierogi are pure comfort food, not health food! But since you asked, here’s the ballpark per serving (about 5 pierogi, with classic potato filling): ~300 calories, 55g carbs, 8g protein, and 5g fat. Sweet versions? Add 10-20g sugar depending on fillings. Of course, drenching them in butter and sour cream is optional… but highly recommended!
FAQs About Pierogi Wigilijne
Can I make the dough ahead?
Absolutely! Prep it 1-2 days early, wrap it tightly in plastic, and refrigerate. Just let it sit at room temp for 30 minutes before rolling—cold dough is stubborn!
What are the best fillings for Christmas?
Savory stars are sauerkraut-mushroom or potato-cheese, but sweet prune or poppy seed fillings are Wigilia classics. (Psst—my family fights over the prune ones every year.)
How long do cooked pierogi keep?
3 days in the fridge, but they’re best fresh. Freeze uncooked ones instead—they’ll last 3 months and boil up like new!
Why did my pierogi fall apart while boiling?
Dough too thick or filling too wet? That’ll do it. Roll thinner, drain fillings well, and pinch those edges like you mean it!
Can I bake pierogi instead of boiling?
Technically yes, but boiling keeps them tender. For baked, brush with butter and bake at 375°F until golden—just expect a different texture.
Share Your Pierogi Wigilijne Experience
Did you make these Christmas pierogi? I’d love to see your creations! Tag me in your photos or leave a comment below—tell me which filling stole the show at your Wigilia table. Happy pinching!
Print
Magical Pierogi Wigilijne: 5 Secrets for Christmas Comfort
- Total Time: 1 hour 20 minutes
- Yield: 4 servings 1x
- Diet: Vegetarian
Description
Traditional Polish Christmas pierogi, filled with savory or sweet ingredients, often served during Wigilia (Christmas Eve dinner).
Ingredients
- 500g all-purpose flour
- 250ml warm water
- 1 egg
- 1 tsp salt
- Filling options: mashed potatoes, sauerkraut, mushrooms, cheese, or sweet fillings like prunes or poppy seeds
Instructions
- Mix flour, water, egg, and salt to form a smooth dough.
- Roll out the dough thinly and cut circles using a glass or cutter.
- Place a spoonful of filling in the center of each circle.
- Fold the dough over the filling and pinch edges to seal.
- Boil pierogi in salted water until they float (3-5 minutes).
- Sauté in butter or serve with toppings like onions or sour cream.
Notes
- Dough should be elastic but not sticky.
- Keep unused dough covered to prevent drying.
- Freeze uncooked pierogi for later use.
- Prep Time: 1 hour
- Cook Time: 20 minutes
- Category: Main Dish
- Method: Boiling
- Cuisine: Polish
Nutrition
- Serving Size: 5 pierogi
- Calories: 300
- Sugar: 2g
- Sodium: 200mg
- Fat: 5g
- Saturated Fat: 2g
- Unsaturated Fat: 2g
- Trans Fat: 0g
- Carbohydrates: 55g
- Fiber: 3g
- Protein: 8g
- Cholesterol: 30mg
Keywords: Pierogi Wigilijne, Polish Christmas pierogi, homemade pierogi