
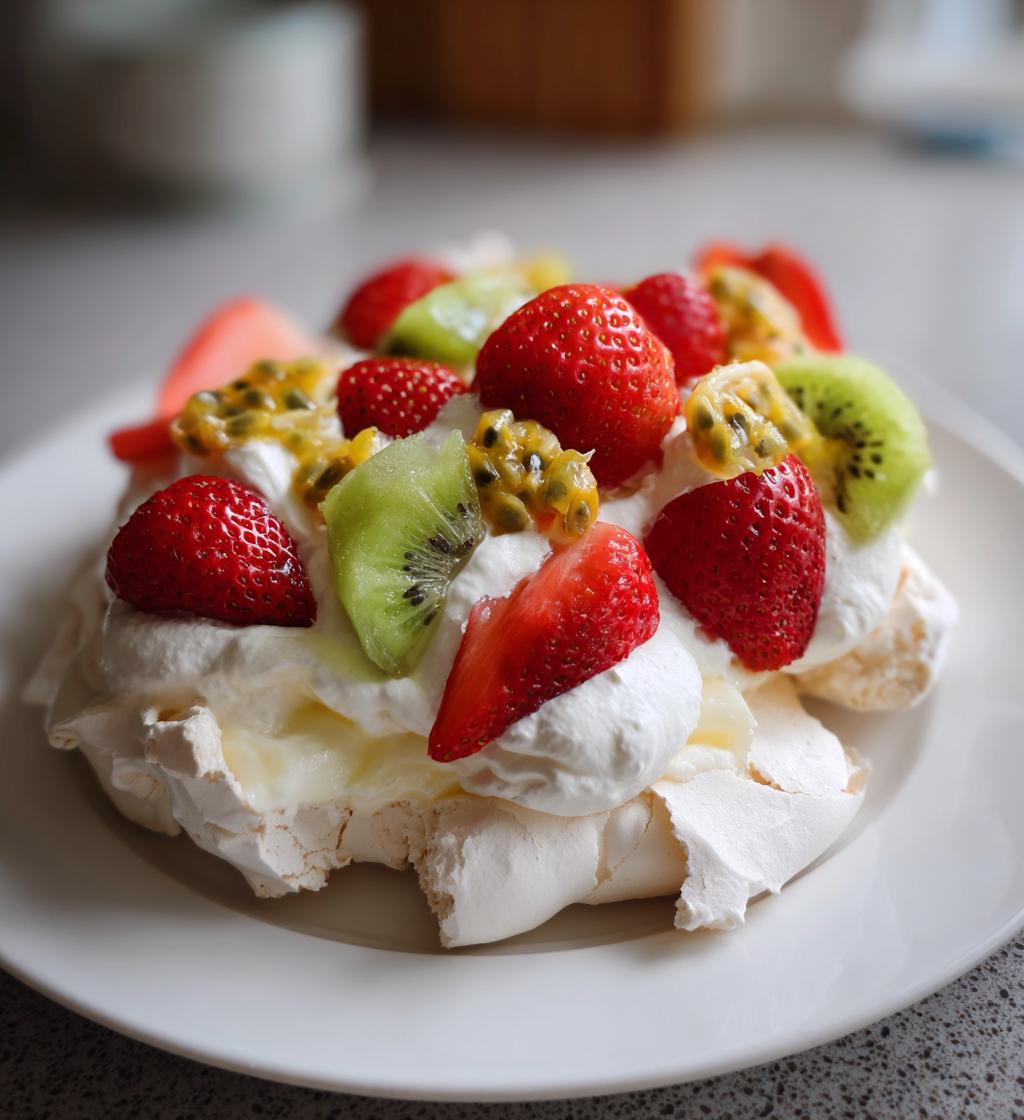
Oh my gosh, have you ever had a pavlova? That first bite is pure magic—crunchy meringue shell giving way to pillowy softness inside, topped with clouds of whipped cream and juicy fresh fruit. I still remember the first time I made one for a summer barbecue—I was SO nervous it would collapse, but when I pulled it out of the oven all golden and crisp, I nearly cried happy tears! This Australian beauty (named after a ballerina, how perfect is that?) is my go-to showstopper dessert because it looks fancy but secretly couldn’t be easier. The best part? You can pile on whatever fruit is in season—berries in summer, passionfruit in winter—and it always tastes like sunshine.
Why You’ll Love This Pavlova Recipe
- That dreamy contrast of crisp shell and marshmallowy center—it’s like biting into a cloud!
- Endless topping options—use whatever fruit makes your heart sing (I’m partial to raspberries and passionfruit).
- Looks fancy enough to impress guests but secretly simple—no pastry skills required.
- Naturally gluten-free, so everyone can dig in.
- The perfect make-ahead dessert—just add cream and fruit right before serving.
- That magical moment when you tap the spoon and hear that satisfying *crack*.
Ingredients for Pavlova
(Trust me, you probably have most of this in your pantry already—it’s that simple!)
- For the meringue base:
- 4 large egg whites (room temperature—this is KEY for volume!)
- 1 cup granulated sugar (superfine works best, but regular is fine)
- 1 tsp white vinegar (helps stabilize the meringue—don’t skip!)
- 1 tsp cornstarch (secret weapon for that marshmallowy center)
- 1 tsp vanilla extract (or swap for almond extract if you’re feeling fancy)
- For the toppings:
- 1 cup heavy cream (chilled—the colder, the better for whipping)
- 2 cups mixed fresh fruit (go wild! Berries, kiwi, mango, passionfruit—whatever’s in season)
- Optional: 1 tbsp powdered sugar for sweetening the cream
Pro tip: Always wipe your mixing bowl and beaters with lemon juice or vinegar before starting—any grease will sabotage your meringue. Learned that the hard way after my first sad, flat pavlova!
Essential Equipment for Making Pavlova
You don’t need fancy gadgets, but here’s what you absolutely need for pavlova success (and one game-changer that makes life easier):
- Stand mixer or electric hand mixer (your arm will thank you—whipping egg whites by hand is a workout!)
- Spotlessly clean mixing bowl (glass or metal, no plastic—and wipe it with vinegar to banish any grease)
- Parchment paper (no substitutions—meringue sticks to everything else like glue)
- Baking sheet (no need for special pans—your regular sheet pan works perfectly)
- Spatula (for gentle folding—no rough treatment for that delicate meringue!)
Bonus points for a piping bag if you want pretty swirls, but a spoon works just fine—my first pavlovas were proudly rustic!
How to Make Pavlova Step by Step
Okay, let’s get to the fun part—making that dreamy pavlova! Don’t let the delicate look fool you; it’s surprisingly easy if you follow these steps. Just take your time, and whatever you do, resist the urge to open that oven door—I speak from tragic, crack-filled experience!
Preparing the Meringue Base
- Beat those egg whites: Start with room temp egg whites (cold ones won’t whip as well). Using your super-clean bowl and beaters, whip them on medium until foamy. Then crank up the speed until you get stiff peaks—when you lift the beaters, the peaks should stand straight up without flopping over. This is your foundation, so don’t rush it!
- Add sugar gradually: Now, with the mixer running, add the sugar one tablespoon at a time, letting each spoonful dissolve before adding more. This slow-and-steady method gives you that glossy, stable meringue. It should look thick and shiny, like marshmallow fluff.
- Fold in the magic trio: Gently sprinkle in the vinegar, cornstarch, and vanilla (no mixer now—use a spatula!). Fold just until combined—overmixing will deflate all that precious air you worked so hard to incorporate.
- Shape it: Spoon or pipe the meringue onto your parchment-lined baking sheet into a circle (or get creative with swirls!). Make a slight dip in the center—this’ll hold all that glorious cream later.
Baking and Cooling the Pavlova
- Bake low and slow: Pop it into a preheated 300°F (150°C) oven and—this is crucial—resist opening the door for the full hour. That steady heat is what gives you the crisp shell and soft center.
- Let it chill: After baking, turn off the oven but leave the pavlova inside with the door slightly ajar. Let it cool completely in there (at least an hour, but overnight is fine too). This gradual cooling prevents cracks—though if it does crack, just cover it with cream later and call it “rustic charm.”
Assembling the Pavlova
- Whip the cream: Just before serving, whip your chilled cream until soft peaks form. I like adding a spoon of powdered sugar for sweetness, but that’s optional.
- Top it off: Spread the whipped cream over your cooled meringue base, then pile on your favorite fruits. Berries, kiwi slices, passionfruit pulp—go wild! The brighter the colors, the more impressive it looks.
- Serve immediately: Pavlova’s at its best when freshly assembled—the crisp shell stays crunchy, and the cream stays fluffy. Though let’s be real, it never lasts long enough to get soggy in my house!
See? Not nearly as intimidating as it looks, right? Just remember: stiff peaks, slow sugar, and absolutely NO oven-peeking. You’ve got this!
Pro Tips for Perfect Pavlova
After making more pavlovas than I can count (and yes, a few disasters along the way), here are my hard-won secrets for guaranteed success every time:
- Grease is the enemy—wipe your bowl and beaters with lemon juice or vinegar before starting to ensure maximum meringue volume.
- Humidity ruins everything—avoid making pavlova on rainy days if possible (or run your AC to keep the kitchen dry).
- Room temp egg whites whip best—take them out of the fridge at least 30 minutes before baking.
- Add sugar sloooowly—a tablespoon at a time, letting each dissolve completely before adding more.
- Stabilize your cream—add a teaspoon of cornstarch while whipping to prevent weeping (especially helpful if not serving immediately).
- Cool completely in the oven—this prevents cracks from sudden temperature changes (though cracks just mean more room for cream!).
- Store components separately—keep baked meringue in an airtight container and add cream/fruit just before serving.
My golden rule? Don’t stress about perfection—even „failed” pavlovas still taste amazing when loaded with cream and berries!
Pavlova Variations and Substitutions
One of my favorite things about pavlova is how easily you can mix it up—whether you’re catering to dietary needs or just feeling creative! Here are some of my go-to twists that always wow:
- Citrus Dream: Add 1 tbsp lemon or orange zest to the meringue for a bright, zesty kick. Top with matching citrus segments—blood oranges look stunning!
- Dairy-Free Delight: Swap the whipped cream for coconut cream (chill a can overnight and whip the solid part). Tropical fruits like mango and pineapple take it over the top.
- Chocolate Lover’s: Fold 2 tbsp cocoa powder into the meringue and top with chocolate shavings. Bonus: drizzle with salted caramel before adding fruit.
- Berry Medley: Mix fresh berries with a spoon of jam for a glossy, jewel-toned topping. Mint leaves make it extra pretty.
- Seasonal Special: In fall, try spiced poached pears; in winter, pomegranate seeds add festive crunch.
- Nutty Crunch: Sprinkle chopped toasted almonds or pistachios over the cream for texture.
- Flower Power: Edible flowers (like violets or pansies) make it Insta-worthy—just check they’re food-safe first!
Don’t be afraid to play around—I once made a „Eton Mess” version by crumbling the baked meringue into layers with cream and strawberries. Delicious chaos!
Serving and Storing Pavlova
Here’s the thing about pavlova—it’s at its absolute *best* when served right after assembly. That crisp shell against the pillowy center? Pure magic. But if life happens (and it always does), here’s how to keep your pavlova dream alive:
- Serve it fresh: Assemble with cream and fruit just before serving—wait any longer and that perfect crunch starts to soften (still tasty, just less dramatic).
- Store components separately: Keep the baked, cooled meringue in an airtight container at room temp for up to 2 days (humidity permitting). Refrigerate whipped cream in a separate container for up to 24 hours.
- Freeze the meringue: Yes, really! Wrap the plain baked meringue tightly in plastic and freeze for up to a month. Thaw at room temperature before assembling.
- Revive stale meringue: If it loses its crispness, pop it in a 200°F (90°C) oven for 10 minutes to re-crisp the exterior.
- Leftovers? (As if!): Store assembled pavlova covered in the fridge for a few hours, but expect the meringue to soften—it’ll still taste amazing, like a cloud of sweet cream and fruit.
Pro tip: If hosting, I bake the meringue the day before, then whip the cream and chop fruit while guests arrive—five minutes to assemble, and boom! Showstopper dessert with zero last-minute stress.
Pavlova Nutrition Information
Okay, let’s be real—we’re not eating pavlova because it’s a health food (though fruit totally counts as a serving of veggies, right?). But if you’re curious about what’s in each heavenly bite, here’s the scoop. Remember, these numbers can vary based on your specific toppings—more cream or extra sugary fruit will change things up!
- Serving Size: 1 generous slice (about 1/8 of the whole pavlova)
- Calories: Around 250 (worth every single one!)
- Sugar: 30g (mostly from the meringue and fruit—nature’s candy!)
- Fat: 10g (thank you, glorious whipped cream)
- Saturated Fat: 6g (the good kind—from dairy, not processed junk)
- Protein: 3g (egg whites doing their thing)
- Carbs: 35g (because happiness is made of sugar and air)
Pro tip: Want to lighten it up? Use less sugar in the meringue (though it might affect texture), go easy on the cream, or load up on lower-sugar fruits like raspberries and blackberries. But honestly? Life’s too short—enjoy that pavlova guilt-free!
Frequently Asked Questions About Pavlova
I get so many questions about pavlova—it’s that magical dessert that makes everyone curious! Here are the answers to the ones I hear most often (plus a few „oops” moments from my own kitchen adventures):
Can I make pavlova ahead of time?
Absolutely! The meringue base keeps beautifully for 2 days in an airtight container (just wait to add cream and fruit until serving). You can even freeze the plain baked meringue for up to a month—thaw at room temperature before assembling.
Help! My meringue won’t get stiff—what went wrong?
Oh honey, I’ve been there! Usually it’s one of three things: 1) Your bowl or beaters had grease (wipe them with vinegar next time), 2) Your egg whites weren’t room temp, or 3) You added sugar too fast. If it’s already runny, sadly there’s no fix—but hey, turn it into Eton Mess by folding in cream and fruit!
What fruits work best on pavlova?
My rule? Whatever’s in season and makes your heart happy! Berries are classic (strawberries, raspberries, blueberries), but passionfruit pulp is my secret weapon—that tartness cuts through the sweetness perfectly. Kiwi, mango, and peaches are fabulous too. Just avoid super juicy fruits like watermelon that’ll make the cream soggy.
Why did my pavlova crack?
First, welcome to the club—even pros get cracks! Usually it’s from cooling too quickly (always let it cool in the turned-off oven) or oven temperature fluctuations (no peeking!). But here’s the secret: cracks just mean more nooks for cream to pool into—call it „rustic charm” and load up the toppings!
Can I make mini pavlovas instead of one big one?
Yes! Spoon smaller mounds onto your baking sheet and reduce baking time to 45-50 minutes. Mini pavlovas are adorable for parties—just top each one with a dollop of cream and a single berry. So cute!
Now I want to hear from YOU—try this pavlova recipe and tell me in the comments: What fruit combo did you use? Any kitchen disasters turned happy accidents? Spill the sweet details!
Print
Dreamy 4-Ingredient Pavlova Recipe That Never Fails
- Total Time: 1 hour 20 minutes
- Yield: 8 servings 1x
- Diet: Vegetarian
Description
A classic pavlova is a light and airy dessert made with a crisp meringue shell and topped with whipped cream and fresh fruit.
Ingredients
- 4 large egg whites
- 1 cup granulated sugar
- 1 tsp white vinegar
- 1 tsp cornstarch
- 1 tsp vanilla extract
- 1 cup heavy cream
- 2 cups mixed fresh fruit (such as berries, kiwi, or passionfruit)
Instructions
- Preheat your oven to 300°F (150°C). Line a baking sheet with parchment paper.
- Beat egg whites until stiff peaks form.
- Gradually add sugar, beating until the mixture is glossy.
- Fold in vinegar, cornstarch, and vanilla.
- Spoon the mixture onto the parchment paper, shaping it into a circle.
- Bake for 1 hour, then turn off the oven and let the pavlova cool inside.
- Whip the cream until soft peaks form.
- Spread whipped cream over the cooled pavlova and top with fresh fruit.
Notes
- Ensure your bowl and beaters are completely grease-free for best results.
- Let the pavlova cool completely in the oven to prevent cracking.
- Serve immediately after adding toppings for the best texture.
- Prep Time: 20 minutes
- Cook Time: 1 hour
- Category: Dessert
- Method: Baking
- Cuisine: Australian
Nutrition
- Serving Size: 1 slice
- Calories: 250
- Sugar: 30g
- Sodium: 50mg
- Fat: 10g
- Saturated Fat: 6g
- Unsaturated Fat: 3g
- Trans Fat: 0g
- Carbohydrates: 35g
- Fiber: 1g
- Protein: 3g
- Cholesterol: 30mg
Keywords: pavlova dessert meringue whipped cream fruit