
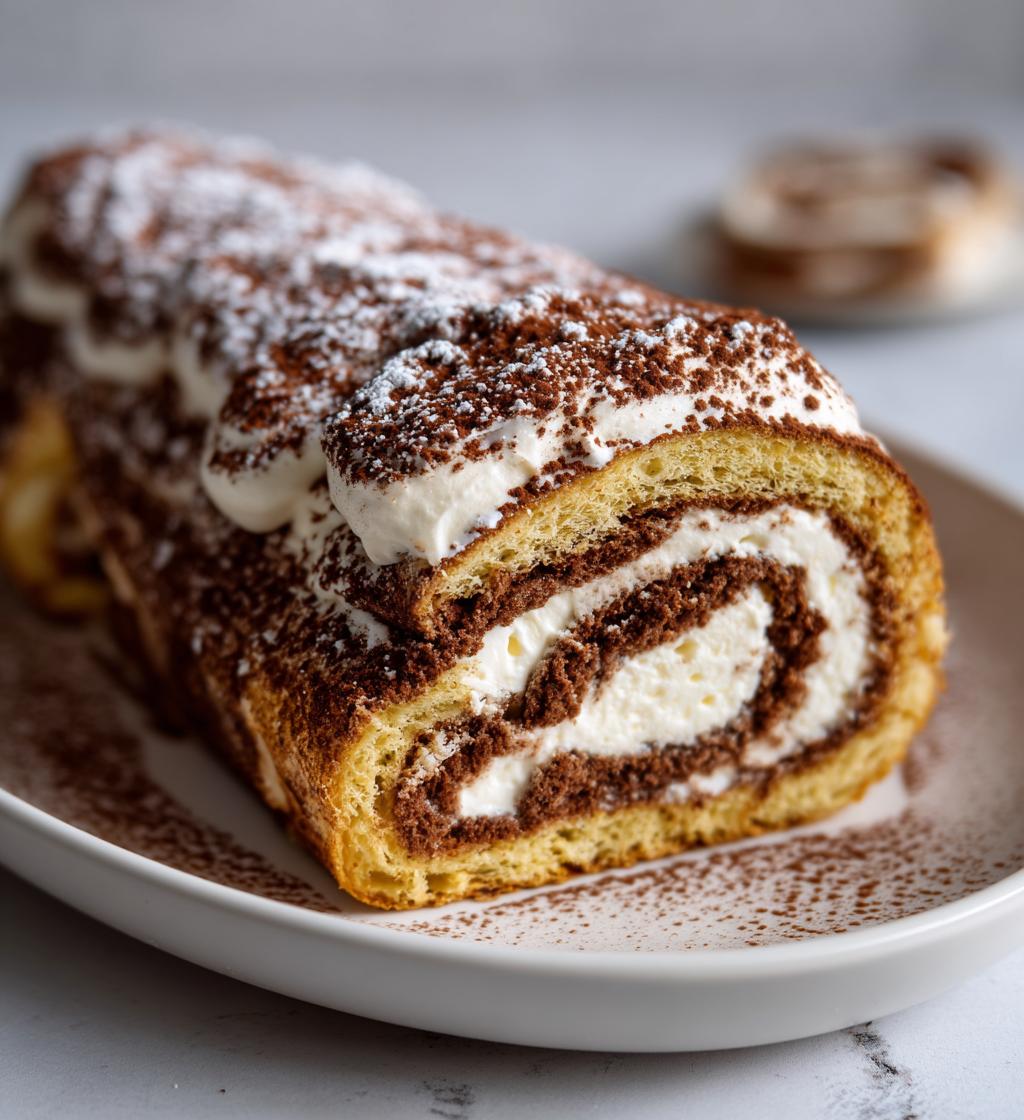
Okay, I have to tell you about my new favorite holiday dessert – this buche tiramisu noel that’s basically Christmas magic on a plate! Picture this: the creamy, dreamy layers of classic tiramisu, but shaped into a gorgeous Yule log that’ll make your guests go „Wow!” without you breaking a sweat. No oven required! I first tried this last year when I was drowning in cookie orders (why do I always overcommit at Christmas?), and it saved my sanity. It’s the perfect mashup of French elegance and Italian indulgence – like if tiramisu and buche de Noel had a delicious holiday baby. Trust me, once you see how easy it is to make something this showstopping, you’ll want to make it every December!
Why You’ll Love This Buche Tiramisu Noel
- No-bake bliss – No oven stress, just mix, layer, and chill (perfect for chaotic holiday kitchens!)
- Showstopper looks – Dusted with cocoa „bark” and snowy powdered sugar, it’s almost too pretty to eat
- Crowd-pleasing flavors – Coffee-kissed ladyfingers meet clouds of mascarpone cream
- Make-ahead magic – Tastes even better after overnight chilling (more time for wrapping presents!)
- Customizable – Swap liqueurs or add chocolate shavings for your signature twist
- Vegetarian-friendly – No gelatin needed, just fluffy egg whites for that perfect texture
Ingredients for Buche Tiramisu Noel
(Tip: Measure everything before starting—this dessert comes together fast when you’re organized!)
- 24 ladyfinger biscuits (about 200g – get the crisp ones, not soft)
- 1 cup strong coffee, cooled to room temp (I use espresso for maximum flavor)
- 2 tbsp coffee liqueur (or swap 1 tsp vanilla extract if you prefer non-alcoholic)
- 500g mascarpone cheese, softened (take it out of the fridge 30 minutes early)
- 3 large eggs, separated (cold eggs whip better!)
- 1/2 cup sugar (granulated works best for dissolving into yolks)
- Cocoa powder for dusting (I like Dutch-process for a darker „bark” look)
- Powdered sugar for that snowy finish (sift it for picture-perfect dusting)
Equipment You’ll Need
- Electric mixer (handheld or stand – those egg whites need serious whipping!)
- Mixing bowls (one large for cream, one medium for egg whites)
- Shallow dish (for quick coffee dipping – I use a pie plate)
- Rectangular platter (about 9×13 inches – go rustic with wood or fancy with marble)
- Spatula (for gentle folding – silicone is my go-to)
- Sifter (for that Instagram-worthy powdered sugar snow)
How to Make Buche Tiramisu Noel
Okay, let’s get to the fun part! This dessert comes together like a holiday dream—just follow these simple steps, and you’ll have a showstopper that looks like you spent hours (when really, you were sipping eggnog the whole time). The key? Don’t rush the chilling—it’s what gives that perfect, sliceable texture!
Step 1: Prepare the Mascarpone Cream
- In a large bowl, beat the egg yolks and sugar like your life depends on it—about 3 minutes with an electric mixer until they’re pale, thick, and ribbony. This is your flavor base, so no skimping!
- Add the mascarpone in big spoonfuls, folding gently with a spatula until JUST combined. Overmixing = grainy texture, and we don’t want that! It should look like fluffy clouds.
- In a separate bowl, whip the egg whites to stiff peaks (they should stand straight up when you lift the beaters). This is what gives our buche that airy lift!
- Now, the magic: fold the whites into the mascarpone mixture in thirds, rotating the bowl as you go. Be patient—gentle folds keep it light!
Step 2: Assemble the Buche Shape
- Mix coffee and liqueur in a shallow dish. Grab your ladyfingers—here’s where speed matters! Dip each one for just 1-2 seconds per side (any longer, and they’ll turn to mush).
- Arrange half the dipped ladyfingers in a slightly curved line on your platter to form the „log” shape. It doesn’t need to be perfect—rustic is charming!
- Spread half the mascarpone cream over the top with a spoon or offset spatula, making swoopy „bark” textures if you’re feeling fancy.
- Repeat with the remaining ladyfingers and cream, offsetting the layers slightly to build height. Congrats—you’ve just built a tiramisu log!
Step 3: Chill and Decorate
- Cover loosely with plastic wrap (press it gently against the cream to prevent drying) and chill for at least 4 hours—but overnight is even better. The wait is torture, I know!
- When you’re ready to dazzle, dust the top generously with cocoa powder using a fine-mesh sieve—imagine you’re frosting a winter forest. Then sift powdered sugar over half like fresh snowfall.
- For extra holiday drama, drag a fork through the cocoa to create bark textures or add edible holly leaves. Slice with a warm knife (dip in hot water, then dry) for clean cuts.
Tips for Perfect Buche Tiramisu Noel
- Cold is key – Use fridge-cold eggs and chill your mixing bowl/beaters for the fluffiest whipped egg whites
- Dunk fast – Dip ladyfingers for just 1-2 seconds per side (trust me, they soak up coffee faster than you think!)
- Chill out – Let it set fully (I know it’s hard to wait) – 4 hours minimum, but overnight makes it slice like a dream
- Decorate last-minute – Dust with cocoa and powdered sugar right before serving so it stays picture-perfect
- Slice smart – Use a knife dipped in hot water for clean cuts (wipe between slices for Instagram-worthy pieces)
- Texture check – If your cream seems thin, pop it in the fridge for 15 minutes before assembling
Ingredient Substitutions & Notes
- Decaf works too – Swap regular coffee for decaf if serving at night (just make it strong!)
- Skip the booze – Replace liqueur with 1 tsp vanilla or almond extract for family-friendly versions
- Gluten-free? – Use gluten-free ladyfingers (check labels, some brands crisp better for dipping)
- Dairy-free mascarpone – Some stores carry plant-based versions (adjust sugar since they’re often sweeter)
- Egg-free option – Substitute pasteurized egg whites or whipped coconut cream (texture will be denser)
- Lazy shortcut – Store-bought whipped cream can sub for egg whites in a pinch (but homemade tastes better!)
Serving and Storing Buche Tiramisu Noel
When it’s time to serve, I love plating slices with fresh raspberries or sugared cranberries for a pop of holiday color—the tartness cuts through the richness perfectly! Store any leftovers (ha—as if!) covered tightly in the fridge for up to 3 days. The flavors actually get better by day two, so it’s a great make-ahead dessert. Just wait to dust with powdered sugar until right before serving so it doesn’t dissolve into the cream.
Buche Tiramisu Noel Nutrition Information
Nutrition varies based on brands—these are estimates per serving:
- Calories: 320
- Sugar: 22g
- Fat: 18g (10g saturated)
- Carbs: 30g
- Protein: 7g
- Cholesterol: 120mg
For lighter versions, try reduced-fat mascarpone or less sugar—but hey, it’s Christmas! 😉
FAQ About Buche Tiramisu Noel
Can I make this ahead of time?
Absolutely! In fact, it’s better when made 1-2 days ahead—the flavors meld beautifully. Just hold off on the final cocoa and powdered sugar dusting until right before serving.
How do I prevent soggy ladyfinger layers?
The secret’s in the speed—dip each biscuit for just 1-2 seconds per side! They absorb liquid FAST, and nobody wants a mushy buche. If you’re nervous, practice with one ladyfinger first.
Can I freeze buche tiramisu?
I don’t recommend it—the texture turns icy and the cream separates. But it keeps perfectly in the fridge for 3 days, so no need to freeze!
What if I don’t have coffee liqueur?
No problem! Use vanilla extract, almond extract, or even a splash of rum. Or skip alcohol entirely—the coffee flavor still shines.
Why did my cream turn runny?
Overmixing mascarpone or under-whipped egg whites can cause this. If it happens, pop the mixture in the fridge for 15 minutes to firm up before assembling.
Now go make this showstopper! Tag me @YourBlogName—I’d love to see your holiday buche creations!
Print
Bûche Tiramisu Noël – 5 sekretów idealnego deseru świątecznego
- Total Time: 4 hours 30 minutes
- Yield: 8 servings 1x
- Diet: Vegetarian
Description
A festive twist on the classic tiramisu, shaped like a Yule log (buche de Noel) for the holidays.
Ingredients
- 24 ladyfinger biscuits
- 1 cup strong coffee, cooled
- 2 tbsp coffee liqueur
- 500g mascarpone cheese
- 3 eggs, separated
- 1/2 cup sugar
- Cocoa powder for dusting
- Powdered sugar for decoration
Instructions
- Beat egg yolks and sugar until pale and creamy.
- Fold in mascarpone until smooth.
- Whip egg whites to stiff peaks and gently fold into mascarpone mixture.
- Combine coffee and liqueur in a shallow dish.
- Quickly dip ladyfingers in coffee mixture and layer in a log shape.
- Spread half the mascarpone cream over the ladyfingers.
- Repeat layers, finishing with cream.
- Chill for 4 hours or overnight.
- Dust with cocoa and powdered sugar before serving.
Notes
- Use freshly brewed coffee for best flavor.
- Chilling overnight improves texture.
- Decorate with holly or edible glitter for a festive touch.
- Prep Time: 30 minutes
- Cook Time: 0 minutes
- Category: Dessert
- Method: No-bake
- Cuisine: Italian-French fusion
Nutrition
- Serving Size: 1 slice
- Calories: 320
- Sugar: 22g
- Sodium: 85mg
- Fat: 18g
- Saturated Fat: 10g
- Unsaturated Fat: 6g
- Trans Fat: 0g
- Carbohydrates: 30g
- Fiber: 1g
- Protein: 7g
- Cholesterol: 120mg
Keywords: buche tiramisu, Christmas dessert, no-bake cake, holiday tiramisu